Clerk E-Certify application is built with a number of external interfaces to connect with host CMS systems and vice versa. The system is built with interfaces to allow seamless integration with Clerk web portal or Clerk applications. Whether the end user is an online user, Clerk’s themselves or external government agencies, you are able to use the API specifications to integrate your system with Clerk E-Certify. The interfaces are broadly classified into two categories namely outbound connector interfaces and inbound connector interfaces.
Outbound connector interface it utilized by Clerk E-Certify to interface with diverse court CMS/Official Records systems to retrieve and process case information, docket information, docket images, official record grantor/grantee information and official record images.
Inbound connector interface is utilized by external systems such as Clerk CMS applications to interface with Clerk E-Certify. Inbound interface allows external applications to send document information for eCertification, utilize Clerk E-Certify shopping cart to hold and process customer requests, and complete payment processing.
You can download Clerk E-Certify integration specification document for detailed instructions on accessing Clerk E-Certify API.
Download API Interface Specification
Click on the link below to download Clerk E-Certify integration guide. This document includes technical specifications on both outbound and inbound connector interfaces.
Download
Shopping Cart Integration
Clerk E-Certify shopping cart is a repository for storing user selected documents prior to check out. Document information can be added to the shopping cart using multiple methods provided by the Clerk E-Certify API. Please note that shopping cart is a temporary storage for storing document meta data and does not store the documents themselves. Please refer to the interface specification document for more details.Shopping cart can be launched as a new browser window or as a pop-up within your web portal.
Document Verification Integration
Clerk E-Certify offers two methods for verifying certified documents. The first method is to verify document by unique code and the second method is to upload the certified document. Both features can be launched from Clerk's own web portal by either browser redirection or as a inline Javascript element.
Shopping Cart Integration
Clerk E-Certify shopping cart is able to process external document requests. This method is utilized in scenarios where the end user is searching Court/Official Record documents on Clerk’s web site. The Clerk’s web application is responsible for the authentication and authorization of the end user prevmissions and granting access to Court cases/Official Records and view images.
Important
Subscriber code and token must be obtained to interface with Clerk E-Certify. Your subscriber code and token is unique per subscriber and should not be shared with any one.
Subscriber code and token is not included within this documentation.
Please contract TRIEDATA to obtain your subscriber code and token.
Note: Your subscriber code and token may differ between the test and the production environment.
Online process integration with Clerk E-Certify is a two-step process. In step one, the Clerk’s web application sends the docket metadata information as an HTTP POST message to Clerk E-Certify web application with a unique identifier. Clerk E-Certify will save this information in its system. In the second step, Clerk’s web application redirects the user to Clerk E-Certify shopping cart passing in the unique identifier for completing payment processing.
After completing step one, there are two ways to launch the shopping cart.
Browser redirection - Redirect the user to Clerkecertify shopping cart window using browser redirection
Java script pop up - Use Java script-based shopping cart and display the shopping cart as a pop-up window within your application.
Following data elements are transferred to Clerk E-Certify as part of the HTTP Post:
Case number (UCN format)
Case number for court records and blank for Official Records
Case type (value = “UCN” p=or "LOCALCASENUMBER")
Case type such as "UCN" or "Local Case Number" or blank for Official Records
Docket description
Document description
Docket number (‘Document ID’ and ‘Document Version’)
Docket number or Official Record Instrument number
Page count
Number of pages within the document
Redaction Flag
Requesting redacted or unredacted image flag
Quantity
Requested quantity of document
You may use native methods or ClerkeCertifyConnector DLL to send information to Clerkecertify. Please consult the interface specification guide to select the right option for your application.
Important
ClerkecertifyConnector is a windows DLL used for interfacing from Clerk’s web application with Clerk E-Certify.
The connector is available for download from Visual Studio Nuget library. Your application can invoke methods within this DLL to allow online users to purchase electronic certified court documents with Clerk E-Certify.
Click here to view nuget gallery for ClerkecertifyConnector.
Browser Redirection
After forwarding selected docket/instrument information using ClerkecertifyConnector API, you can redirect the user to view the shopping cart. User can confirm the details and complete the checkout process using a valid US issued credit card. This is one of the easiest ways to integrate shopping cart with your application.
GETSHOPPINGCARTURL()
This method is available within the ClerkecertifyConnector DLL. This method returns the URL of Clerkecertify shopping cart and is utilized by the caller application to redirect the user to Clerk E-Certify. All you need to do is redirect the user using JavaScript or other means.
Clerk E-Certify performs following actions upon browser redirect.
Retrieves document information posted earlier using HTTP Post.
Groups all requests using the unique identifier passed in by the caller.
Verify images are available for all requested documents.
If images are available, they are automatically added to the shopping cart and user is redirected to the shopping cart view.
If one or more images are not available, user has the option to proceed to the cart or go back to search engine.
User can perform “checkout” to finalize the transaction and receive the documents in an email.
Javascript based shopping cart - popup
instead of redirecting the user to clerkecertify.com for checkout, you may use Java script to launch the shopping cart as a modal pop-up window within your application. Clerkecertify shopping cart will be displayed as a popup window as shown above. This method offers tighter integration and will inherit the look and feel of your application.
Here are the steps for integrating shopping cart as a popup window
Contact TRIEDATA to advise them about your test and production domain. TRIEDATA needs to enable requests coming from your specific domain (For example: browardclerk.org, osceolaclerk.com etc.)
Get shopping cart correlation ID
Initialize your shopping cart
Add items to the shopping cart as shown in example above
Call method GetCorsShoppingCartReferenceId to retrieve the correlation ID
                                // Sample code
                                ShoppingCart myShoppingCart = new ShoppingCart(SessionID, Url, PublisherCode, SubscriberCode, Token,"First name","Last name,"Email ID","Phone number");
                                foreach (var rec in model.eCertifyORDoc)
                                {
                                Var ret = myShoppingCart.AddORDocToShoppingCart(rec.InstrumentNo, rec.DocumentType, rec.PageCount, rec.Quantity.ToString());
                                }
                                var correlationId = myShoppingCart. GetCorsShoppingCartReferenceId ();
Load all pre-requisite 3rd party libraries such as bootstrap, jQuery, Jquery-ui and Jquery-forms. If your application has already loaded these components, then you do not need to load them.
Create a HTML Div element to hold the shopping cart icon window. This DIV element will load an icon of the shopping cart with the number of items currently in the cart.
									<!-- ID Cart will display shopping cart icon with number of items currently added to the cart -->
                                            <div id="idCart" style="height:50px; width:50px;padding-top:15px;"></div>
                                            <div id="idCorrelationId" hidden></div>
Use JavaScript to populate the DIV upon completion of document load (You may use other events as appropriate)
                                            <script type="text/javascript">
                                                $(document).ready(function () {
                                                    // Lets get the Cart Image with counts now
                                                    var CorrelationId = $('#idCorrelationId').html();
                                                    var url = ShoppingCartServer - URL + "/Level2Request/GetCorsCart?CorrelationId=" + CorrelationId;
                                                    $.ajax({
                                                        url: url,
                                                        type: 'get',
                                                        success: function (data) {
                                                            var text = data;
                                                            $('#idCart').html(data);
                                                        }
                                                    });
                                                });
</script>
										// ShoppingCartServer-URL – Please check your documentation for test and production environments
This will display a shopping cart within your div and will show the number of items within the cart. User can click on this shopping cart and will open a pop-up box to complete th transaction. Remeber to
refresh the shopping cart, by invoking the Ajax call, after adding new items to the cart.
Clerk E-Certify offers two methods for verifying certified documents. The first method is to verify by unique code and the second method is to upload the certified document.
TRIEDATA Verification Integration Tutorial
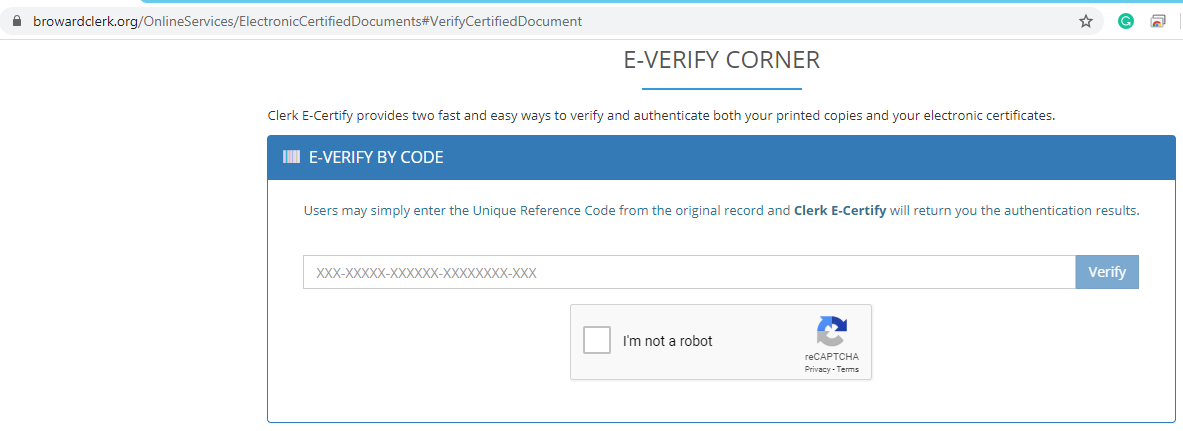
Verification by Code
Verify by code method is used by either entering the unique code on Clerk eCertify web site or by scanning the QR code embedded on the first page of the certified document.
The system confirms the validity of the code and optionally allows the user to download watermarked original document for side-by-side comparison. Verify by code user interface can be launched by two methods.
Javascript verification - A java script-based interface is available for integrating document verification with your web site.
You can use following steps to embed the verification module within your web application
Contact TRIEDATA and advise them about your domain name (Example: Browardclerk.org, Osceolaclerk.com etc.). Each domain name needs to be explicitly added to the access control lisT.
Load all pre-requisites such as bootstrap, jQuery, Jquery-ui and Jquery-forms. If your application has already loaded these components, then you do not need to load them.
Create a HTML Div element to hold the Verify by Code element. This DIV element will be populated with a text box and google recaptcha element
									<!-- ID Cart will display shopping cart icon with number of items currently added to the cart -->
                                                <div id="idCart" style="height:50px; width:50px;padding-top:15px;"></div>
                                                <div id="idCorrelationId" hidden></div>
Use JavaScript to populate the DIV upon completion of document load (You may use other events as appropriate)
                                                <script type="text/javascript">
                                                    $(document).ready(function () {
                                                        var fileSource = 'https://www.clerkecertify.com/VerifyImage/CorsCodeGetIndex';
                                                        $.ajax({
                                                            url: fileSource,
                                                            timeout: 4000,
                                                            statusCode: {
                                                                404: function () {
                                                                    // Simple not found page, but not CORS violation
                                                                    $("#idCorsOrigin").html(this.url + " not found");
                                                                }
                                                            }
                                                        })
                                                            .fail(function (jqXHR, textStatus) {
                                                                // Empty status is a sign that this may be a CORS violation
                                                                // but also check if the request timed out, or that the domain exists
                                                                if (jqXHR.status > 0 && jqXHR.statusText == "timeout") {
                                                                    $("#idCorsOrigin").html("Unable to launch validation module Error code: " + jqXHR.status + " " + jqXHR.statusText + " error");
                                                                    return;
                                                                }
                                                                else {
                                                                    $("#idCorsOrigin").html("Please refresh your browser page again: Error code: " + jqXHR.status + "-" + jqXHR.statusText);
                                                                    return;
                                                                }
                                                            })
                                                            .done(function (data) {
                                                                // Successful ajax request
                                                                $("#idCorsOrigin").html(data); or - black g - font - weight - 600 mb - 4 g - pl - 5"
                                                            });

                                                    });
</script>
This will display the verify by code element within your web portal. You may have to tweak the timeout value to a higher value depending upon user bandwidth constraints.
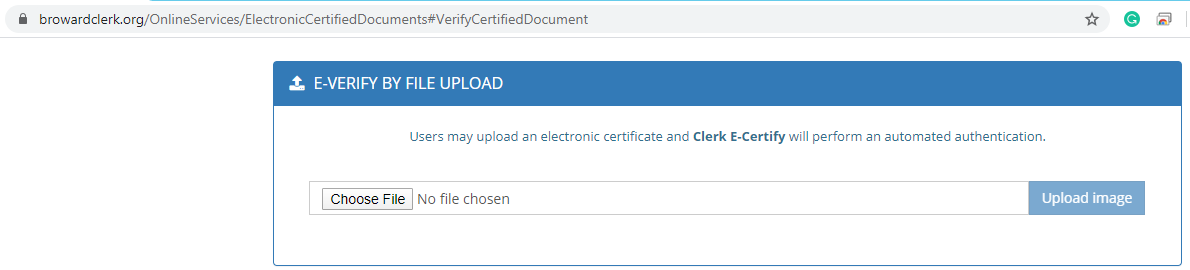
Verification by File Upload
Verify by file upload method is used for validating electronic copy of the certified document. Users can upload the document and the system will perform an exhaustive set of checks to verify the authenticity of the document.
Verify by file upload is the most authentic and easiest way to validate a certified copy. This method validates a variety of security features within the document and does not require the user to view the original document.
Since this method is able to analyze cryptographic signatures embedded within the document and able to indepependantly confirm authenticity of the document, this method is always preferred if the end user has access to the
electronic copy of the certified document.
Further, all certified documents can be verified by this method and does not require a side-by-side comparison. Since certain court documents are not allowed to be displayed to general public, this method is the preferred method for validating all document types.
There are two ways to validate an electronic file...
Javascript verification - A java script-based interface is available for integrating document verification with your web site.
You can use following steps to embed the verification module within your web application
Contact TRIEDATA and advise them about your domain name (Example: Browardclerk.org, Osceolaclerk.com etc.). Each domain name needs to be explicitly added to the access control list before below code is used.
Load all pre-requisites such as bootstrap, jQuery, Jquery-ui and Jquery-forms. If your application has already loaded these components, then you do not need to load them.
Use JavaScript to populate the DIV upon completion of document load (You may use other events as appropriate)
                                            <script type="text/javascript">

                                                $(document).ready(function () {
                                                    var fileSource = 'https://www.clerkecertify.com/VerifyImage/CorsFileGetIndex';
                                                    $.ajax({
                                                        url: fileSource,
                                                        timeout: 4000,
                                                        xhrFields: {
                                                            withCredentials: true
                                                        },
                                                        statusCode: {
                                                            404: function () {
                                                                // Simple not found page, but not CORS violation
                                                                $("# idCorsFileOrigin ").html(this.url + " not found");
                                                            }
                                                        }
                                                    })
                                                        .error(function (jqXHR, textStatus) {
                                                            // Empty status is a sign that this may be a CORS violation
                                                            // but also check if the request timed out, or that the domain exists

                                                            $("#idCorsFileOrigin").html("We have encountered an error Status: " + jqXHR.status + "-" + jqXHR.statusText);
                                                            return;
                                                        }
                                                        )
                                                        .fail(function (jqXHR, textStatus) {
                                                            // Empty status is a sign that this may be a CORS violation
                                                            // but also check if the request timed out, or that the domain exists
                                                            if (jqXHR.status > 0 && jqXHR.statusText == "timeout") {
                                                                $("#idCorsFileOrigin").html("Unable to launch validation module Error code: " + jqXHR.status + " " + jqXHR.statusText + " error");
                                                                return;
                                                            }
                                                            else {
                                                                $("#idCorsFileOrigin").html("Please refresh your browser page again: Error code: " + jqXHR.status + "-" + jqXHR.statusText);
                                                                return;
                                                            }
                                                        })
                                                        .done(function (data) {
                                                            // Successful ajax request
                                                            $("#idCorsFileOrigin").html(data);
                                                        });
                                                });
</script>
This will display the verify by image element within your web portal. You may have to tweak the timeout value to a higher value depending upon user bandwidth constraints.
Contact Us
701 Market Street Suite 115, St. Augustine, FL 32095